Monostrand Post-Tensioned Stressing Anchor Pocket Damage & Repair
Introduction
The stressing anchor pocket is a recognized potential weak point in unbonded post-tensioned reinforcement, which is one reason why tendon encapsulation systems exist. The assessment and repair of stressing anchor pockets has become a growing concern as post-tensioned structures age, and the following will attempt to summarize some of the issues that arise during the remediation process. It should also be recognized that stressing anchor pockets are used in the construction of multi-strand post-tensioned structural members as well, and while they can face many of the same issues that will be addressed here, this topic focuses primarily on unbonded monostrand post-tensioning anchor pockets.
Dead-end, Intermediate, and Live-end anchors

Image 1: Section view of a typical encapsulated stressing anchor components.
Encapsulated and non-encapsulated anchors
The encapsulation of unbonded post-tensioning is generally comprised of a polyethylene plastic that provides a continuous covering of all the individual cable and anchorage components for the purpose of preventing water ingress into the tendon. The Post-Tensioning Institute (PTI) requires the use of encapsulated tendon systems for structures where the design falls under the ACI 3183.3 building code. The PTI also recommends encapsulation for slab-on-ground post-tensioning, and structures in an aggressive environment where there is a possibility of tendon exposure to chlorides or other corrosive substances. Typically, encapsulation includes the strand sheathing, a ductile cast iron anchor that’s encased in a plastic covering, a transitional tube that connects the anchor to the sheathing, and it’s finished with a grease filled cap to seal the anchor at the anchor pocket. A non-encapsulated anchor would include only the strand with plastic sheathing and the bare ductile cast iron anchor. It is important to note that non-encapsulated anchors lack the over molded plastic anchor covering that’s needed to mechanically engage with the grease cap seal, and this will be addressed later in more detail.
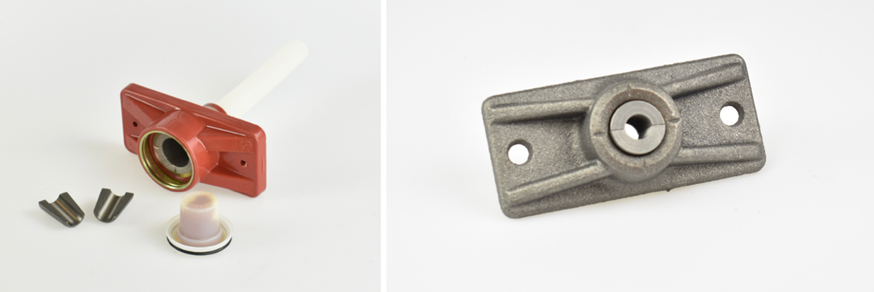
Image 2: An encapsulated stressing anchor on the left, and non-encapsulated anchor on the right
Problems related to new construction tendon finishing
There are several typical conditions that are routinely encountered during the repair of existing post-tensioned structures which will date back to the original construction of the structure.
Cables were trimmed but never stressed:
This condition is usually identified after the pocket grout has been removed and the wedges are found to be either loose or missing. While this could be the result of a wedge seating failure at the fixed end anchor during tensioning, that’s often not the case, because the cables remain fully engaged with the opposing fixed end terminal anchorage. Were the failure to have occurred at the fixed end, the repair would typically require either the replacement of the entire tendon length, or the installation of a splice coupler in order to add the length of strand needed to stress the tendon. If the cable remains anchored at the fixed end anchor, then there exists the possibility of tensioning at the stressing anchor location, but this requires a specialized repair protocol and equipment. Additionally, the condition of the cable tail is critical in determining if restressing of the existing cable will be possible. If the cable tail is too short, or too badly corroded, there will not be enough usable strand available to permit re-tensioning.
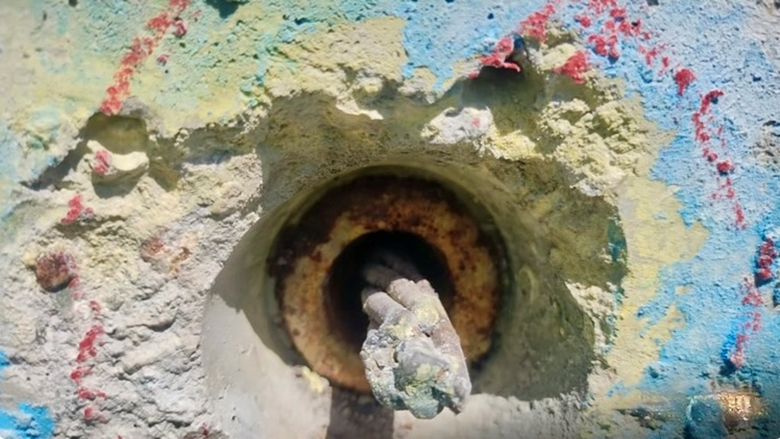
Image 3: Cable found with missing wedges after the grout was removed.
Cable tails were cut too long:
Following tensioning, the cables should be cut to a length that will provide adequate coverage of the strand for non-encapsulated anchors, or that will permit the secure installation of the encapsulated anchor grease cap. When the tails are too long on non-encapsulated anchors, they can expose the cable ends to excessive corrosion, which could migrate over time back to the anchor wedges and tensioned portions of the cable. On encapsulated anchors, cable tails that are too long can prevent the grease cap from seating properly and will create a breach in the continuity of the tendon encapsulation. In either case, these deficiencies could reduce the useful life of the tendons if they have been subjected to water ingress or electrochemical corrosion of the strand.
Voids or shrinkage cracking of the pocket grout:
Other common problems that are found during structural remediation are usually the result of improper mixing or placement of the cementitious grout used to fill the anchor pockets. These include excessive cracking at the bond line between the grout and the concrete substrate, and voids in the pocket grout. Shrinkage cracking is often the result of retempering of the grout mixture during installation, which results in excessively high water-cement ratios. Additionally, the surface of the stressing pocket concrete can be contaminated with grease from the strand or other contaminants, which will inhibit proper bonding of the grout to the concrete pocket surface. Problems of this nature can be very detrimental to the useful life of the post-tensioning because it may permit water to ingress directly into the tendon anchor and result in accelerated corrosion of the steel elements. This issue can be particularly detrimental when the stressing anchors are subjected to prolonged direct water exposure. Anchors located below grade level can be exposed to rainwater, landscaping irrigation, or even the water table. Additionally, any anchors located in structures that retain water, such as planters, water tanks, or swimming pools, may be subjected to increased hydrostatic water conditions and pressurized water infiltration. In these situations, the installation of a waterproof membrane at the surface can be critical in protecting the anchor pockets from water infiltration.
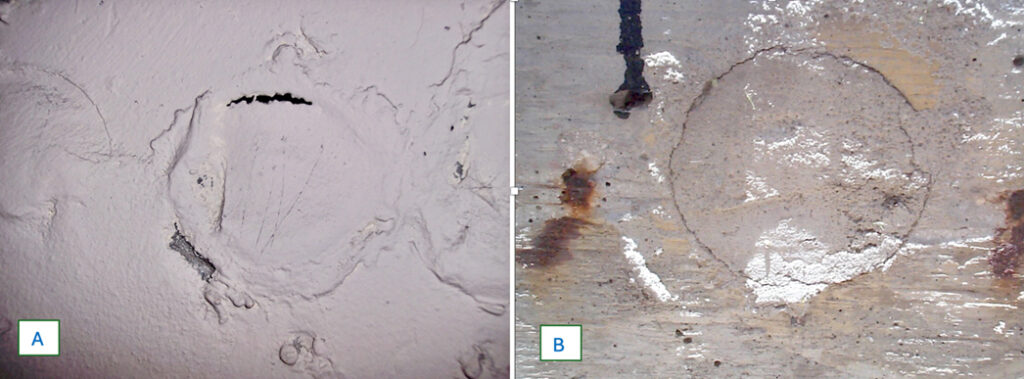
Image 4A: Void located at the top of the stressing anchor pocket. 4B: Drying shrinkage cracks in grout.
Damage to the encapsulated anchor burn ring:
Many encapsulated anchors use a metal burn ring that is incorporated into the anchor. This ring serves two purposes; it protects the anchor encapsulation plastic from the heat of an oxygen acetylene torch used to cut the cable tails to length, and it provides a rigid interface to engage with the grease cap used to seal the anchor encapsulation. When the metal ring has sustained heat damage, it disrupts the integrity of the tendon encapsulation. The repair of this condition has been addressed using replacement metal rings, but this repair is becoming increasingly difficult because of the lack of availability of the metal rings. That’s because manufacturers are reluctant to provide only the burn ring due to liability concerns associated with their use retroactively.
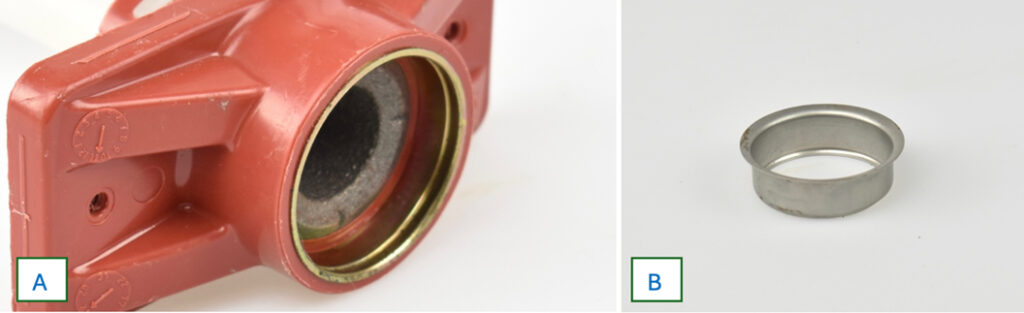
Image 5A: Encapsulated anchor with burn ring installed. 5B: Replacement burn ring.
Excessively shallow stressing anchor pockets:
This is more of an issue caused by the location of the stressing anchors relative to the surface of the concrete. Stressing anchor pockets can vary in depth, but their design should provide adequate coverage for the face of the anchor. There are conditions where anchors are placed too close to the concrete surface and coverage is minimal. This condition is primarily observed with non-encapsulated anchors, which increases the corrosion potential of the unprotected anchor, wedges, and strand.
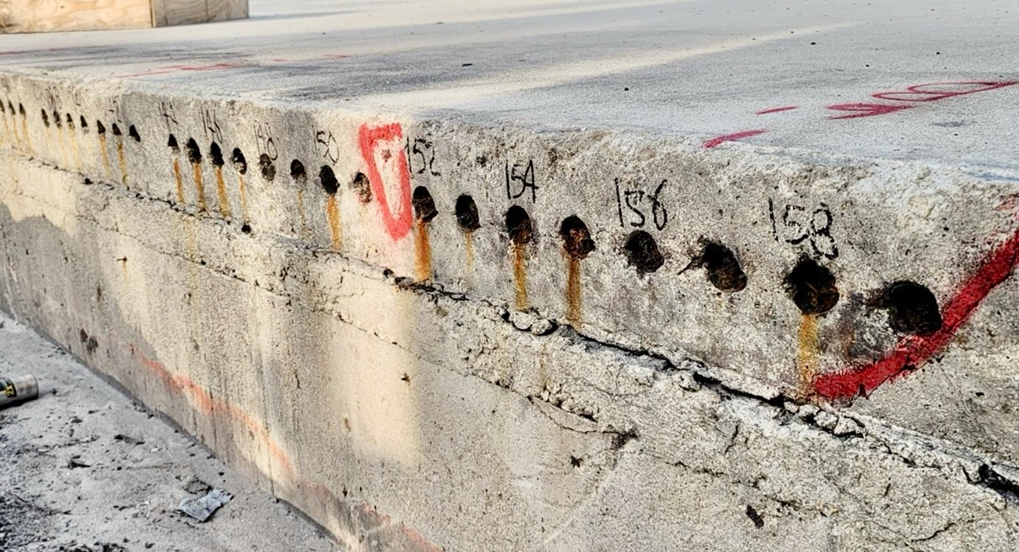
Image 6: Anchors placed too close to the surface and lacking adequate stressing anchor pocket coverage.
Anchor pockets that were never filled with grout:
This is a condition that is often found at interior tendon terminations, usually at an expansion joint. It’s assumed that the contractor believed that it was unnecessary to fill the anchor pockets with grout because the expansion joint would protect the stressing anchors from water exposure. However, expansion joints are eventually likely to fail, which then places the post-tensioning at an increased risk of damage due to corrosion resulting from exposure to water.
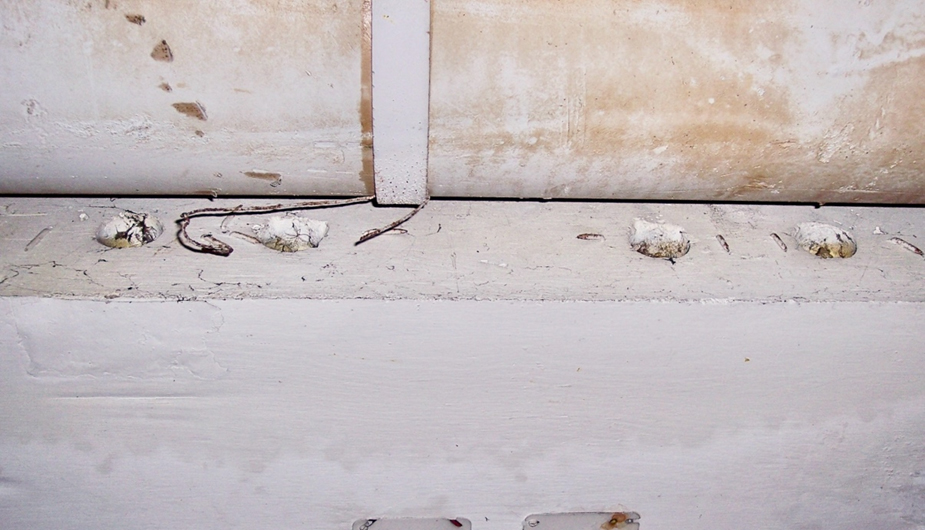
Image 7: Unfilled anchor pockets located at interior expansion joint.
Tendon durability issues related to anchor pocket conditions
When attempting to determine the condition of existing post-tensioning as related to the stressing anchor pockets, there are several factors that typically warrant more attention.
Exposure to water:
Water infiltration into the tendon strand and sheathing can be the single most significant cause of cable failure that is associated with the stressing anchor pocket condition. While it is possible for water to enter the tendon through cracks in the concrete structure, irregularities in the stressing anchor pocket grout and encapsulation can provide avenues for water to enter directly into the tendon. This is particularly a concern when the anchors are located at or below grade, or at other locations where the anchors can be exposed to prolonged hydrostatic water pressure such as planters, pool walls, and gutters. It should also be recognized that certain types of architectural elements such as stucco and EFIS details, located on top of the anchor pockets, can retain water if delaminated. In these circumstances, there is an increased importance of inspecting the anchor pockets to determine if they were finished correctly. At the very least, the anchor locations should be visually inspected for evidence of drying shrinkage cracks or voids in the pocket grout.
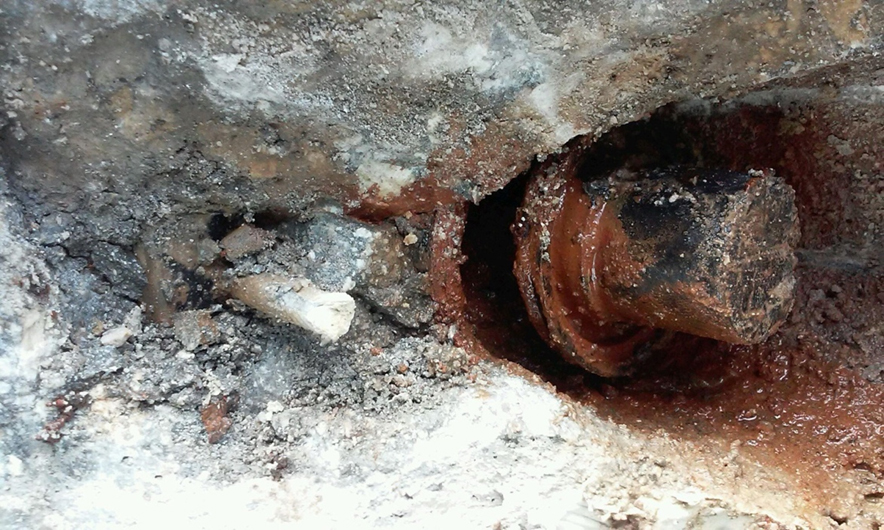
Image 8: Water leaking from anchor after pocket grout removed.
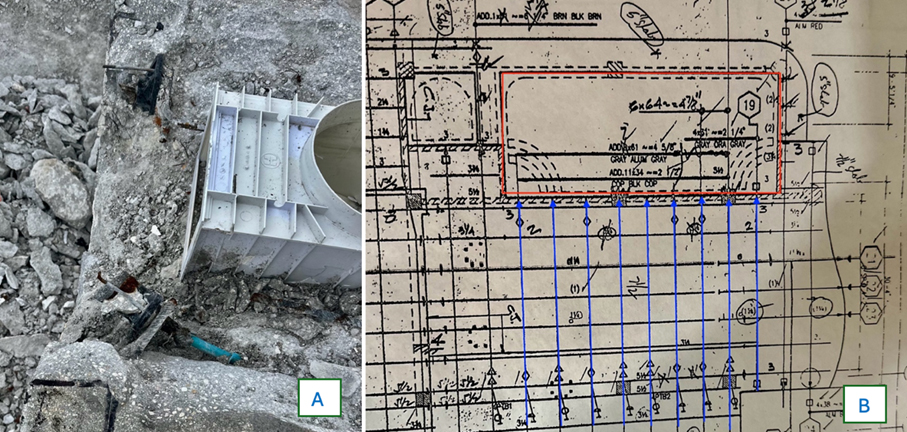
Image 9A: Exposed anchors at pool skimmer. Image 9B: Plan showing stressing anchors located in pool wall.
Electrochemical corrosion of the anchor and strand tails:
This issue should be separated into two categories: non-encapsulated and encapsulated anchor systems. Non-encapsulated anchors are usually a less complex issue because the entire terminal anchor and strand tails are fully encompassed in concrete. Therefore, the concrete conditions that factor into increased electrochemical corrosion potential, such as increased concrete chloride content and reduced concrete pH, should be relatively consistent at the anchor depth and will generally affect the anchor, strand tail, and even the mild steel bursting bar reinforcement uniformly. This means that there would not usually be an appreciable difference in the amount of corrosion that is found to exist with each of these tendon components.
However, it can be more complex and difficult to assess the condition of encapsulated anchor systems. The primary reason is that the tendon components are isolated from direct exposure to the surrounding concrete by means of the plastic strand and anchor encapsulation, which insulates the steel components from electrochemical corrosion potential. This limits the visual condition assessment to obvious signs of damage, such as displaced strand or wedges, or water exfiltrating from the exposed anchor. Finally, a word of caution regarding the broader interpretation of tendon conditions based on an inspection of the anchor pocket. It is recognized that there may be an interest in determining whether a tendon has been compromised by corrosion based exclusively on a visual inspection of the exposed steel anchor face and strand tail. However, experience has demonstrated that it can be difficult to reach a meaningful conclusion unless there are other factors that serve to reinforce this determination. These should include recognized deficiencies in the anchor pocket grout, evidence of water infiltration into the tendon, or damage to the mild steel reinforcement and concrete structure surrounding the terminal anchor, as well as evidence of structural distress (deflection, bending, punching shear, etc.), which would be an indication of the significant loss of post-tensioning in a localized portion of the structure.
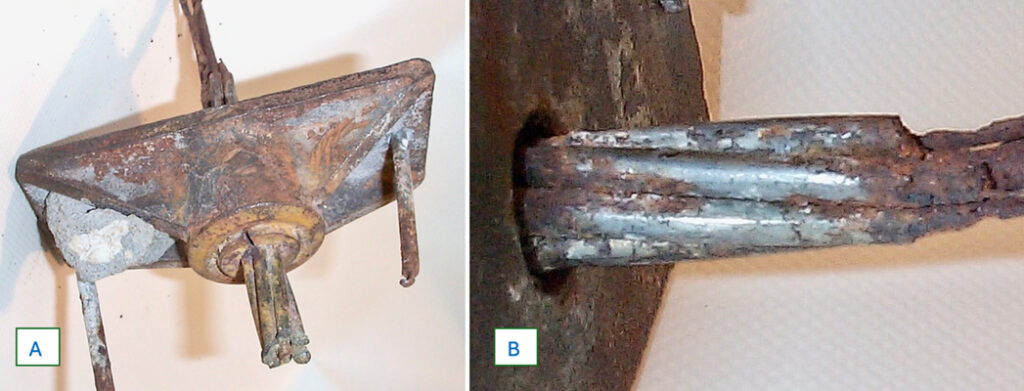
Image 10a: This extracted anchor exhibits minimal corrosion of the strand tail, anchor, & wedges. 10B. Yet the portion of strand under tension had failed due to significant corrosion.
Inspection and repair of existing stressing anchor pocket conditions
The remediation of stressing anchor pockets is a growing scope of work in the structural restoration field, yet it is also one of the most often misunderstood. A common problem is that some engineers and architects may not have adequate experience with post-tensioning and this can lead to difficulty with providing solutions to problems that are encountered in the field. This can be compounded by the fact that there is limited guidance from the post-tensioning and concrete structural repair industries regarding specific repair protocols that are available for use in these efforts.
Useful industry resources available:
Design professionals will occasionally call for adherence to recommendations provided by the post-tensioned hardware manufacturer, but there are no companies known to be forthcoming with this type of information. It should be recognized that these companies are only in the business of providing certified post-tension materials, and they will not provide written directions for their use. However, there are two principal industry organizations that are available to provide guidance to the structural restoration industry in these matters, and they are the Post-Tensioning Institute (PTI) and the International Concrete Repair Institute (ICRI). Between these organizations, there are two documents that may be useful in the assessment and repair of stressing anchor pocket conditions.
First, is the PTI Guide Specification for Unbonded Post-Tensioning Repair (DC80.4-18). This document offers recommendations for general types of materials that should be used to coat the exposed anchor (a field applied epoxy), and the grout used to fill the anchor pocket (a nonmetallic & non-shrink grout). This leaves a lot of latitude for the design professional to use specific materials that they have previously found suitable for these types of applications. Additionally, the document offers guidance for the process that should be used to finish the stressing anchor pocket, including trimming the strand tails, and installation of the anchor encapsulation. However, a drawback with this document is that it is written primarily from the standpoint of new construction and it does not offer any specific guidance for the remediation of existing anchor pocket conditions.
A second document is produced jointly by the PTI and the ICRI, and it is the Guide for Evaluation and Repair of Unbonded Post-Tensioned Concrete Structures (PTI DC80.3-12/ICRI 320.6), which delves deeper into the process of anchor pocket remediation. For example, Section 3.3.1.1 provides the following outline for anchorage inspection:
- Inspect the condition of the stressing pocket grout.
- Confirm that the anchorage is dry and free of moisture.
- Check the anchor and wedges for serious corrosion, which should not be confused with common surface rust.
- The PTI also cautions against drawing conclusions from the exposed strand tail condition because corrosion may vary elsewhere on the tendon.
The PTI/ICRI guide further summarizes a recommended process for finishing of stressing anchor pockets (Section 4.6.4 — Stressing pockets). While this section does offer some specific recommendations to follow for the finishing of anchor pockets, there remains a lot of latitude provided to the design professional regarding the exact process and materials that should be used for this work.
Common stressing anchor pocket repair problems
There are a number of issues that are routinely encountered as part of the structural restoration process, and most are the result of well-intended design professionals that may not have an adequate understanding of post-tensioning.
Burn ring replacement:
As addressed previously, anchor burn rings can be damaged using an oxygen acetylene torch to trim the tensioned strand. Some design professionals call for the replacement of these damaged burn rings. However, not only are the replacement rings increasingly difficult to obtain, but this work can also be misguided. That’s because if the torch has burned through the metal ring, it most certainly has also melted some of the plastic anchor encapsulation. Given that the PTI requires an encapsulated anchor assembly to withstand up to 10 psi of hydrostatic pressure for 24 hours, there is no practical mechanism to field test the integrity of the repaired anchor. Therefore, this raises the concern that the replacement of the burn ring is not capable of producing fully functional encapsulation, which also brings into question whether this is an appropriate repair.
Grease cap replacement:
As the remediation of existing stressing anchor pockets is becoming an increasingly common part of many post-tensioned structural restoration projects, there is often little consideration given to whether the new available grease cap is compatible with the existing anchor burn ring. It’s worthy to note that while many grease caps may appear identical, there is a high probability that there will be dimensional differences between the existing anchor cap and the available replacement. Experience has shown that while these differences may be slight, the fact remains that it may not fit as well as the original cap. Depending on the significance of these differences, the design professional may consider the replacement of the rubber O-ring with a sealant to help ensure a better seal.
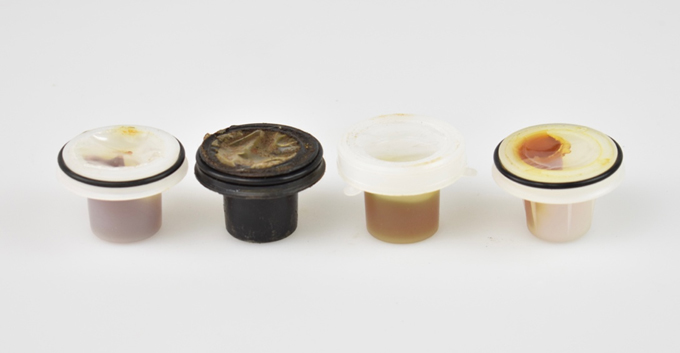
Image 11: Examples of grease caps from several different encapsulated anchor systems.
Installing grease caps on non-encapsulated anchors:
There are instances when a design professional specifies the installation of new anchor grease caps as part of a structural restoration project, without the foreknowledge that the existing post-tensioning is a non-encapsulated anchor system. It should be part of the project inspection process to determine the nature and condition of the post-tensioned anchors that are exposed during the anchor pocket repairs. Once it has been determined that the existing anchors are non-encapsulated, the design professional should amend the scope of work to remove this requirement. That’s because non-encapsulated anchors lack the mechanical ability to attach the grease cap to the anchor, which will leave the new cap loose in the pocket. Not only does the cap serve no functional purpose, but it can also interfere with the ability to properly install grout to fill the anchor pocket and could result in the creation of voids in the grout.
Cleaning anchor pockets:
A key to any good repair is proper preparation. Therefore, one should avoid the use of techniques or materials that are likely to increase corrosion of the existing post-tensioning or could result in a potential bond failure of the new pocket grout. There have been instances when project bid specifications have included work such as cleaning anchors and pockets with high pressure water, the application of water based rust conversion chemicals, or the direct application of grease to the exposed anchor, wedges, and strand tail. Although well intended, these are likely to do more harm than good and should be reconsidered.
Innovative product solutions
There have been several innovative products developed in recent years that are intended to help solve some of the stressing anchor pockets problems previously identified:
Anchor Pocket Seals:
The Anchor Pocket Seal is designed to provide an option for the repair of damaged encapsulated anchors, or as a means of protecting non-encapsulated anchors. This polyethylene plastic cap is constructed using the most common stressing anchor pocket dimensions to create a compressive seal within the pocket. Therefore, it is not reliant on engagement with the anchor itself to provide a secure mechanical attachment. When used with an epoxy or caulk sealant to help bridge irregularities and deformations in the surface of the existing anchor pocket, the Anchor Pocket Seal can help prevent water ingress into the tendon.

Image 12: The Anchor Pocket Seal before and after installation. (www.post-tensionproducts.com)
Post Tension Plugs:
The Post Tension Plug is an anchor pocket filler that is intended to help overcome problems associated with the installation of field mixed grout used to fill stressing anchor pockets. It’s a precast plug made of 8,000 psi, non-shrink, non-metallic grout that is bonded to the anchor pocket with an epoxy adhesive. It is designed to fit the stressing pocket after it has been abraded using the Post Tension Plug Reaming Tool and ensures 1″ of coverage after the grease cap has been properly seated.
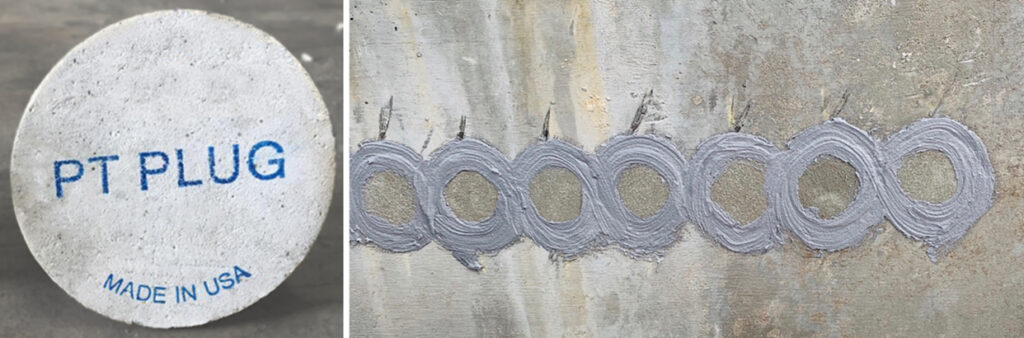
Image 13: The Precast Post Tension Plug before and after installation. (www.posttensionplugs.com)
Conclusion
The purpose of this bulletin has been to help provide a greater understanding of this important topic, and there are several key concepts that we hoped to have made clear:
- Post-tensioning systems within each structure can have unique characteristics, and it is the design professional’s responsibility to inspect and understand these issues.
- There is guidance available from the PTI/ICRI to assist with the inspection and repair of stressing anchor pocket conditions.
- Avoid making broad reaching conclusions based exclusively on the surface condition of the exposed anchor, wedge, and cable tails within the stressing pocket.
- Keep the repair process simple and avoid reliance on overly complex, unsound, or unproven repair protocols and materials.
For more information:
Please email us at info@GenBuild.net